Connect a laptop to a projector using the right cable or wireless method in minutes.
I’ve set up projectors for classrooms, boardrooms, and home theaters for years. In this guide I share clear steps, real tips, and simple fixes so you can learn how to connect a laptop to a projector fast. You’ll get practical help with cables, adapters, wireless casting, display settings, and common problems. Read on to get a reliable setup and avoid last-minute stress.
Why connect your laptop to a projector?
Projectors let you show slides, videos, and live demos on a large screen. Learning how to connect a laptop to a projector makes meetings and classes clearer. It also helps when you present, teach, or watch movies with friends.
Use the right cable or wireless option to keep the picture sharp. A proper setup also handles audio when you need sound. Knowing a few steps saves time and reduces last-minute problems.
Source: youtube.com
What you need before you start
Check your laptop ports. Look for HDMI, USB-C, DisplayPort, VGA, or a full-size HDMI adapter. Older projectors may use VGA or DVI. Newer models usually offer HDMI or USB-C.
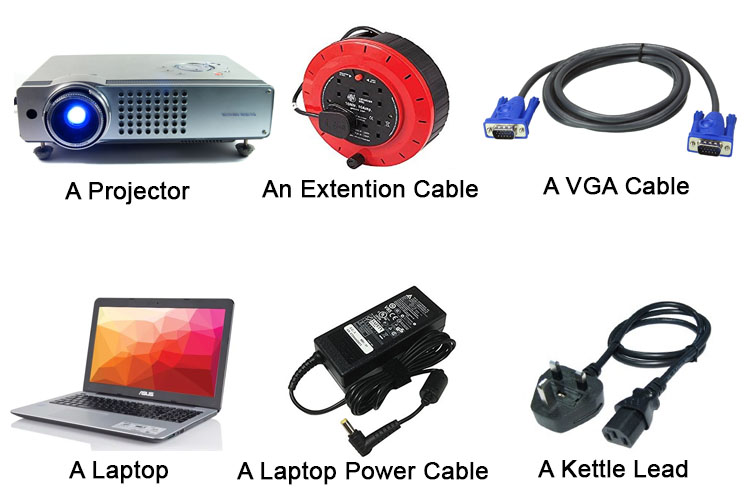
Gather cables and adapters. Pack an HDMI cable and a small adapter kit. Take the projector remote and power cords. Know your laptop’s display settings and whether you need audio output.
Quick checklist before you connect
- Identify laptop video port: HDMI, USB-C (Alt Mode), DisplayPort, or VGA.
- Confirm projector inputs: HDMI, VGA, DVI, or wireless (Miracast/AirPlay/Chromecast).
- Bring adapters: USB-C to HDMI, USB-C to VGA, or DisplayPort to HDMI if needed.
- Test audio needs: HDMI/USB-C can carry sound; VGA requires a 3.5 mm cable.
- Charge or bring power: laptop battery, projector lamp hours, and a power strip.
Common connection options
Pick the method that both devices support. Here are the common ways to connect a laptop to a projector, with short notes on when to use each.
- HDMI — Best for video and audio together. Most modern laptops and projectors support HDMI. Plug-and-play with the right cable. HDMI 2.0 and 2.1 support 4K and higher refresh rates if the projector and laptop do.
- USB-C with Alternate Mode — Carries video and audio over one port. Use a USB-C to HDMI or USB-C to DisplayPort adapter if the projector needs it. Many new ultrabooks use USB-C as the primary display output.
- DisplayPort — Found on some laptops and workstations. Supports high resolution and refresh rates for crisp images and is common on professional gear.
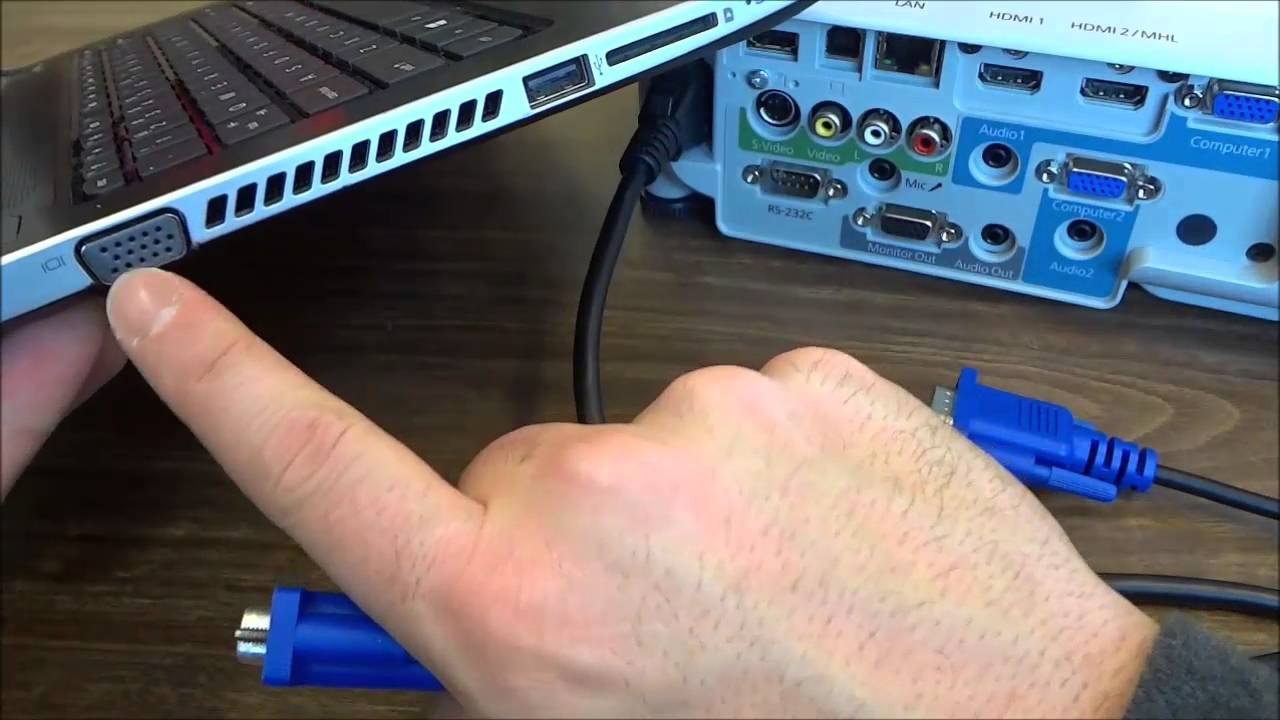
- VGA — Older analog option. Use it for legacy projectors. VGA sends video only, so you’ll need a separate audio cable. Expect lower sharpness than digital connections.
- DVI — Digital video only. Less common now but still used in some venues and older hardware. It does not carry audio.
- Wireless (Miracast, AirPlay, Chromecast) — Useful when cables are not practical. Wireless usually adds a small lag and may need setup on both devices. Good for quick sharing, BYOD environments, and guest presenters.
When deciding how to connect a laptop to a projector, balance image quality and convenience. Wired links are more stable and give lower latency. Wireless is handy for quick sharing or mobile demos.
Adapters and hubs explained
Adapters and USB hubs can bridge mismatched ports. Use a simple USB-C to HDMI adapter for one-off setups. For many connections, a USB-C hub with HDMI, VGA, and Ethernet saves time. Prefer active adapters when converting between digital and analog signals (for example, USB-C to VGA). Active converters include a chip that translates the signal reliably.
How to choose the right cable or adapter
Match the laptop output to the projector input. If both have HDMI, use an HDMI cable. If the laptop has only USB-C, use a USB-C to HDMI adapter. For old projectors with VGA, choose a USB-C to VGA active adapter. For venues where multiple users connect, a simple HDMI switch or an AV matrix can help. Carry a short and a long cable to fit different room layouts.
Source: org.uk
Step-by-step: how to connect a laptop to a projector
Below are clear wired and wireless procedures. I keep them short so you can follow quickly before a meeting or class.
Wired connection (fast and reliable)
- Turn off both devices. This avoids hot-plug issues with some projectors and adapters.
- Plug the video cable into the laptop first. If using an adapter, attach it to the laptop and then connect the cable.
- Plug the other cable end into the projector.
- Power on the projector, then power on the laptop. Wait a few seconds for auto-detection.
- Select the projector input. Use the projector remote or on-device buttons to choose HDMI, VGA, or the correct port.
- Configure the laptop display. On Windows, press Windows+P and choose Duplicate, Extend, or Second screen only. On macOS, open Displays in System Settings and pick Mirror or Extend. On Linux, use the Display settings or xrandr for fine control.
- Check audio. If HDMI or USB-C carries audio, test the sound. If not, run a 3.5 mm cable to the projector or to external speakers.
Quick wired checklist
- Correct cable and adapter connected firmly.
- Projector set to the same input as your cable.
- Display mode set on the laptop (Duplicate/Extend/Mirror).
- Audio routed to projector or to external speakers if needed.
Quick pre-presentation test (do this 10–15 minutes early)
- Connect the cable and confirm the projector receives a signal.
- Open your slide deck or video and check each slide and video clip.
- Test audio on the projector speakers or room PA.
- Confirm laptop power settings prevent sleep or screen saver.
- Have a backup: spare HDMI cable, USB-C adapter, and a USB thumb drive with your presentation.
Wireless connection (convenient, with some trade-offs)
- Confirm both devices support the same wireless standard. Use Miracast for many Windows devices, AirPlay for Apple devices, or Chromecast for Chrome-based casting.
- Enable casting on the projector or plug in a wireless dongle (Chromecast, Apple TV, or a Miracast adapter). Set the projector to the right mode.
- On the laptop, open the display or casting menu. Choose the projector name and start casting. On Windows use Connect or Project, on macOS use AirPlay in the menu bar, and in Chrome use Cast.
- Expect a small delay. For video with tight sync or professional recordings, use a wired connection instead.
Wireless tips
- Place the wireless dongle or projector close to the Wi‑Fi access point for stronger signal.
- Close background apps that use the network to reduce lag.
- Use 5 GHz Wi‑Fi when possible for lower interference and higher throughput.
From my experience, always test the setup 10–15 minutes before you need it. I learned this the hard way during a class demo. Having a spare HDMI cable and a USB-C adapter saved the day once when a presenter’s laptop lacked HDMI.
Advanced display settings (when you need better image quality)
If the image looks soft, change the laptop resolution to the projector’s native resolution. For many projectors that is 1920×1080 (Full HD) or 1024×768 for older models. Also check refresh rate (60 Hz is common) and color profile if colors look off.
For video, enable hardware acceleration in your media player, and set the player to match the display rate. For presentations, prefer 16:9 slides if the projector is widescreen to avoid black bars or stretched images.
How to match resolutions quickly
On Windows, right-click the desktop, choose Display settings, and pick a resolution that matches the projector. On macOS, open Displays in System Settings and select Scaled options or the native resolution. On Linux, use Settings or xrandr to set exact values. If you are unsure, try 1920×1080 first for modern projectors and 1024×768 for older classroom projectors.
Troubleshooting common issues
If the projector shows no image, try these quick fixes. Below are common problems and fast checks.
- No signal message — Recheck cable fit and select the correct input on the projector. Swap the cable to test it. Try another HDMI port if available.
- Wrong resolution or cut-off image — Change the laptop resolution to match the projector. Use 1024×768 or 1920×1080 when unsure. Check scaling settings on Windows and macOS.
- No sound — Ensure the laptop audio output is set to HDMI/USB-C or to external speakers. Check projector volume and mute settings.
- Flicker or low brightness — Check projector lamp hours and eco mode. Replace the lamp or switch to high-brightness mode if needed. Also check loose cables and grounding.
- Wireless lag or dropouts — Move devices closer, reduce interference, or switch to a wired link for smooth video. Update firmware and drivers for better stability.
I once spent 20 minutes fixing a flash drive error when the projector input was set to USB instead of HDMI. Check the input source first; it often fixes the problem fast.
When to update drivers or firmware
Update your laptop’s graphics drivers and the projector’s firmware if you get odd behavior. New drivers fix compatibility and add support for newer adapters. Manufacturers like Epson, BenQ, Optoma, and Sony publish firmware updates on their support pages.
Common driver and firmware update steps
- For Windows, visit the GPU maker (Intel, NVIDIA, AMD) or your laptop vendor and download the latest graphics driver.
- For macOS, use System Settings > Software Update to get the latest macOS updates that include graphics fixes.
- For projectors, check the support page on the manufacturer site and follow their firmware update tool carefully. Back up settings if the projector UI allows it.

Source: youtube.com
Tips for best results
Small habits make every projection run more smoothly. I follow these routines before every talk.
- Pack a small kit — include HDMI, VGA, USB-C adapter, 3.5 mm cable, and a power strip. Keep everything in a labeled pouch.
- Match resolution — Set the laptop to the projector’s native resolution for the best image.
- Use duplicate or mirror for simple presentations. Use extend when you want presenter notes and private control.
- Lock sleep mode — Turn off sleep and screen savers before you start. They interrupt your talk and confuse the audience.
- Test audio paths — If audio matters, test it on the actual projector or the room speakers. Check volume and mute buttons in software and on the projector.
- Label adapters and cables — This saves time when you rush between rooms or venues.
Recommended spare kit
- HDMI cable (1.5–3 m)
- USB-C to HDMI adapter
- VGA cable and 3.5 mm audio cable
- Small power strip and extension cord
- USB thumb drive with your presentation as backup
My rule: always arrive early and run a full test. That habit cut tech delays in half during my events.
Frequently Asked Questions of how to connect a laptop to a projector
How do I mirror my laptop screen to a projector?
On Windows, press Windows+P and pick Duplicate. On macOS, open Displays and choose Mirror. Make sure the projector input matches your cable. For wireless, use the Cast/Connect/AirPlay option and select the projector or dongle name.
Which cable gives the best picture from laptop to projector?
HDMI and DisplayPort give the best digital image and carry audio. USB-C with Alternate Mode is next if your laptop supports it. For legacy gear, DVI is fine for video-only, while VGA is the lowest-quality option because it’s analog.
What if my laptop has only USB-C and the projector has only VGA?
Use a USB-C to VGA adapter or a USB-C hub that includes VGA output. Remember VGA does not carry audio—add a 3.5 mm cable if you need sound. Prefer an active converter for reliable results.
Why is the projector image fuzzy or stretched?
The laptop resolution might not match the projector. Set the laptop to the projector’s native resolution and check aspect ratio in display settings. Also verify the lens focus and zoom on the projector.
Can I connect multiple laptops to one projector?
Yes. You can switch cables or use a hardware switcher for wired setups. For wireless, some projectors and dongles support multiple connections or guest casting. A meeting room switcher or AV matrix helps when several users switch rapidly.
How do I send sound to the projector from my laptop?
If using HDMI or USB-C, set the laptop audio output to the projector. If you use VGA, plug a 3.5 mm audio cable from the laptop to the projector or to external speakers. Always test audio levels before you start.
Conclusion
You can learn how to connect a laptop to a projector in a few clear steps. Pick the right cable or wireless method, test early, and keep a small kit handy. Use simple checks for signal, resolution, and audio to avoid delays.
Try a quick setup before your next talk. Share what worked or ask a question in the comments. Subscribe or return for more clear, tested tips on tech and presentations.